Story Boards

SCENE 1: INTERIOR LIVING ROOM

IMG_0357

For the first scene I wanted to capture that Christmas Eve atmosphere. Stockings will be hung above the fireplace and the Christmas tree lights will be twinkling on and off. There will be a window in the shot and snow subtly falling outside. As I am choosing to create short animated scenes as opposed to a animation based around characters, I wanted the various elements of the composition to subtly build a story and add context to the scene. For example, looking at the the first scene we can see that cookies and milk have been left out for Santa, who has already paid a visit and left presents underneath the tree. The fireplace is still burning suggesting someone in the house is still awake.

Animated Elements:

  • Snow
  • Fireplace
  • Tree Lights
  • Snow outside window

SCENE 2: Christmas Toy Shop Window

IMG_0360

For the second scene, I will be creating a Christmas toy shop window with various animated elements moving across the composition. Compared to the other two scenes, this composition will be the most cluttered and contain the most action. I want toys to be spread across the front of the window, whilst a few animated elements play behind the stationary objects. There will be a rocking horse in the background slowly coming to a stop, as well as a toy train passing through from one side to the other. To add further movement, I will create a toy plane and have it fly through the top of the scene, as well as overlay a snow effect on the outside of the window.

Animated Elements:

  • Train
  • Snow
  • Rocking Horse
  • Toy Plane
  • Mini Christmas Tree

SCENE 3: EXTERIOR SNOWY SCENE

IMG_0363

The final scene will be an exterior shot of a house covered in snow at night time. There will be a full moon glowing in the sky and a silhouette of Santa on his sleigh fly past. There will be a bare tree with flashing fairy lights outside and perhaps some faint footprints visible on the snow on the roof. Finally, just like the other two scenes I will overlay a snow effect.

Animated Elements:

  • Snow
  • Santa on sleigh
  • Fairy lights
  • Stars


Adobe Character Animator

Adobe Character Animator

Adobe Character Animator is a character animating application that allows you to bring to life your 2D or 3D creations. Using a webcam, you are able to mimic facial expressions and synchronise mouth movements to match speech. The application allows you to import projects from Photoshop and Illustrator and control all aspects of the character’s movement.

Experimentation

Originally, my idea was to use Adobe Character Animator to create a single character that the animation would focus around. Having watched a few beginner tutorials on Youtube, I decided to have a go creating a Christmas fairy that would interact with the various components in the scene.

Looking on the Adobe website I found a number of free puppets and assets to download for beginners to play around with the software and use for their own creations.

Screen Shot 2017-12-12 at 23.03.07Screen Shot 2017-12-12 at 23.07.38

After downloading the ‘Maddy’ puppet, I had a quick go at changing the hairstyle and clothing to see how challenging creating similar assets would be. Admittedly, I underestimated just how time consuming the whole process would be, especially when you need to create the different profiles and facial expressions to match. As I was working from an existing puppet, I was able to speed the process up by altering the existing settings and designs.

Screen Shot 2017-12-12 at 22.40.36

Once my designs were complete, I was able to open the file up in Adobe Character Creator and have a go at animating Maddy speaking. If I was to take this one step further, I could follow a tutorial like the one shown below to add movement and make my puppet walk.

Screen Shot 2017-12-12 at 23.26.14

Although when creating my Christmas fairy I was able to customise a pre-made puppet template, if I was to use Adobe Character Animator for my final project, then I would need to look at creating my own 3D character using something like Maya or Blender. Again, this would be quite a time consuming process, as I would also have to take into consideration that this would only constitute a small fraction of the project. Moreover, even after modelling and texture painting my character, I would still have to create the backgrounds and other elements of the animations. Given that I have chosen to create one project per semester and am working towards the deadline of the 8th December in time for the event, I may have to look at alternative means or alternatively 2D animations.

Screen Shot 2017-12-12 at 23.30.15

Bibliography

Adobe (2017) Getting Started with Adobe Character Creator. Adobe: Worldwide. Available from https://helpx.adobe.com/uk/adobe-character-animator/using/getting-started.html [Accessed 1st October 2017]


Looking into Software

WHeavyMhen looking into potential software that I could use for my project, I began by looking at HeavyM, a simple easy to use video mapping software. As someone who is still very new to 3D projection mapping, I wanted to conduct some research into existing software and compare the pros and cons of each, to help me decide which one to use.

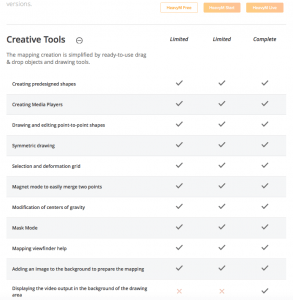
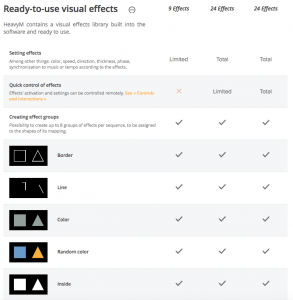
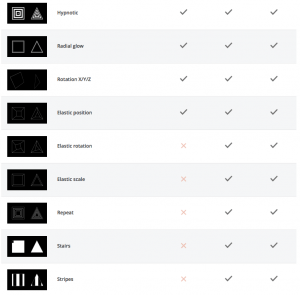
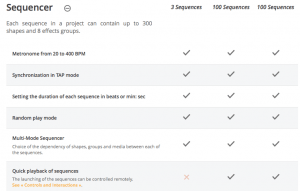
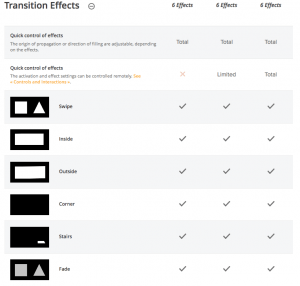
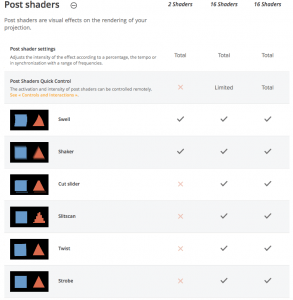
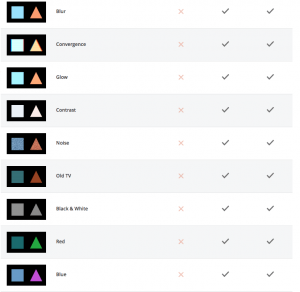
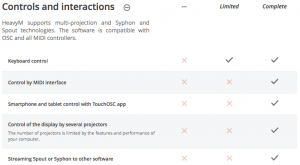
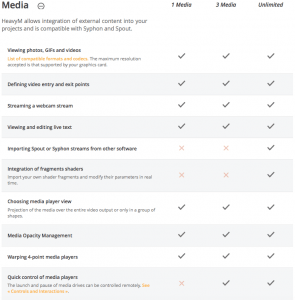
Currently, the HeavyM software is available in three different versions: HeavyM Free, HeavyM Start and HeavyM Live. Below I have attached a side by side comparison chart of all three versions so you can see the additional features offered offered by the upgraded version.

Screen Shot 2017-10-30 at 20.49.11

Screen Shot 2017-10-30 at 20.51.56Screen Shot 2017-10-30 at 20.52.48Screen Shot 2017-10-30 at 20.53.44Screen Shot 2017-10-30 at 20.54.29Screen Shot 2017-10-30 at 20.54.40Screen Shot 2017-10-30 at 20.55.32Screen Shot 2017-10-30 at 20.55.49Screen Shot 2017-10-30 at 20.56.51Screen Shot 2017-10-30 at 20.58.17Screen Shot 2017-10-30 at 20.58.31Screen Shot 2017-10-30 at 20.59.22Screen Shot 2017-10-30 at 21.00.05Screen Shot 2017-10-30 at 21.00.42

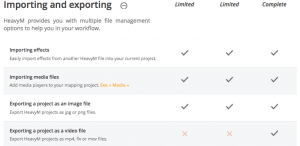
Looking at the cost of each, the basic start up software is free to download with the option to upgrade to HeavyM Start for $19 (3 months) or $99 (lifetime). Alternatively, you can opt for the complete pro HeavyM Live package for $59 (3 months) or $399 (lifetime). I think for the nature of my project, I do not feel it necessary to pay for the full version however, this does mean that I will not be able to export my final project as a video file. Consequently, when presenting my project in its final form I will not be able to show an export video of my work. Instead, I have chosen to present the individual assets and videos that I have created on After Effects, combined with a video recording of the final product live at the event.

When deciding between the free version or the $19 upgrade, the main difference in features which I think may be useful for my project, is the sound reaction effect offered with the paid version. I think this is something which might work nicely with my project, allowing the different elements of my composition to move in sync to the music. Moreover, with the free version of the software there would be a watermark added, whereas this can be removed in the paid version.

vpt07logo2-1Alternatively, when researching into the kinds of projection mapping software out there, I came across VPT 7, a free multipurpose realtime projection software tool for Mac and Windows created by HC Gilje. Just like HeavyM, the software allows you to combine recorded and live footage and is available on both Mac and Windows.

Pros: It is completely free to use providing that you acknowledge the VPT and provide a link to their homepage if you are using it for a project.

Cons: Graphical User Interface is not as easy to navigate compared to other available software, however there are plenty of online resources and tutorials available to help you.

5636996143_09e5eb296e_z

Another piece of software that I found to be extremely popular and highly rated by its users is Mad Mapper. As a stand alone projection mapping software, Mad Mapper is constantly being updated and improved based on its user feedback. From reading its reviews I found that many users commented on its user friendly interface and high performance.

Unlike the other two, the full version of Mad Mapper is not free with prices starting at around $349 for a perpetual license. Although they offer a free version to download and try, despite the fact that this version is not time limited, there are a few limitations that include:

-Watermark in the input, preview and output.

-Scan produced by the Spatial Scanner is limited and cropped to 1/4th of its resolution.

-Connected lighting will blink once every minute when using MadLig.

Moreover, as a student I would qualify for educational prices starting at $249 + tax (2 computers), $591 + tax (5 computers) or $1170 + tax (10 computers).
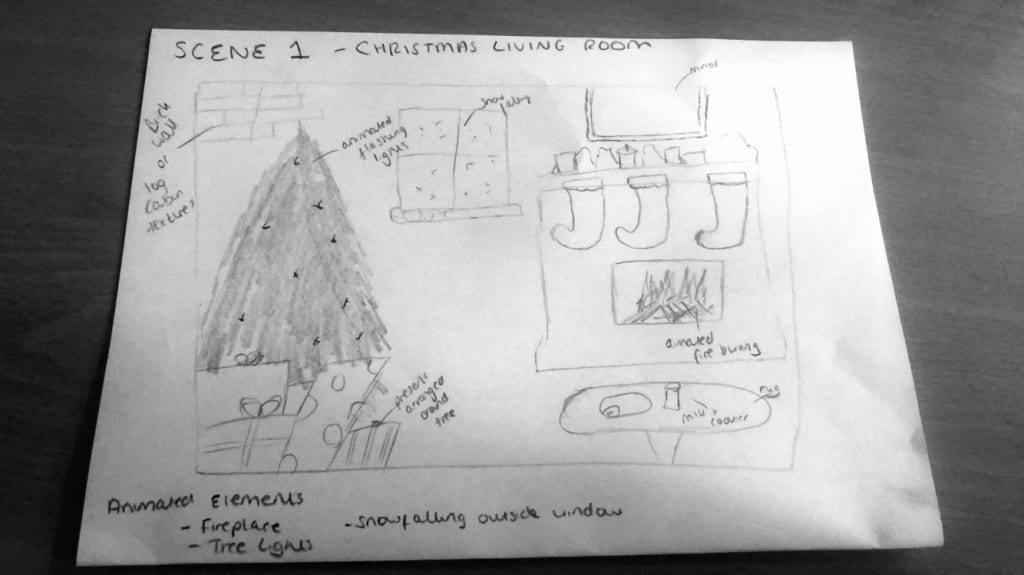
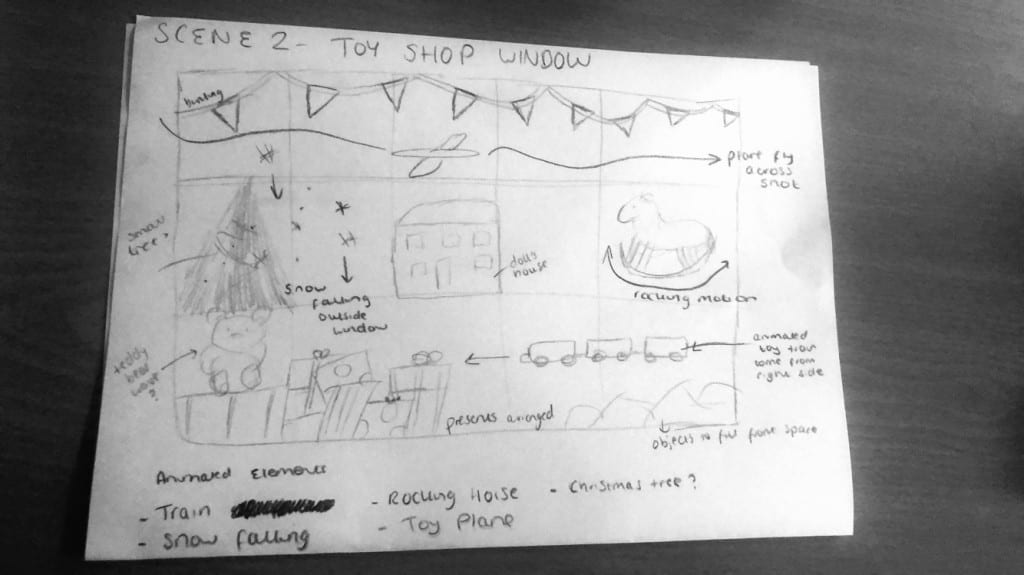
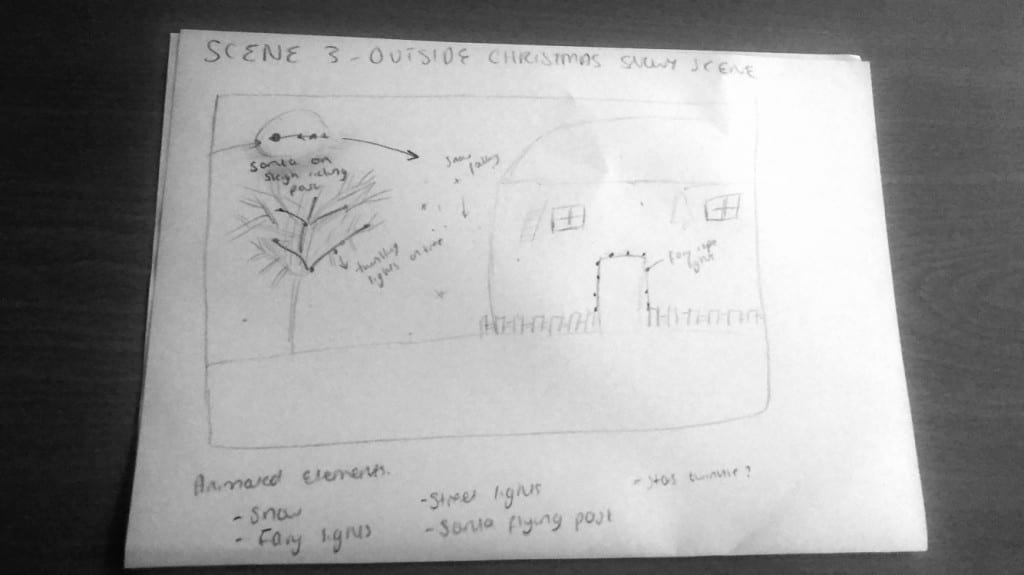
Conclusions

I think at this stage in time I am leaning more towards using HeavyM and purchasing the $18 Heavy M start package. This however, does not mean that I will completely disregard the possible of using any other software. I fully intend to download VPT 7 and experiment a little with the software, despite what I have read about its poor GUI. Although review and performance wise Mad Mapper is definitely the strongest out of the three, I still believe that for my particular project and its small scale, I do not feel it necessary to spend $249 on a piece of software, when there are very similar ones for a much cheaper cost. If however, my project was a large scale architecture piece then I would definitely be more inclined to look at something like Mad Mapper.


References

https://hcgilje.wordpress.com/vpt/

http://projection-mapping.org/which-projection-mapping-software/


Proposal

Name  Hollie Griffin
Tutors  Graham Cooper, Jon Holmes, Clive McCarty and James Field
Assessment Strand  1
Project Outline & Aims

 Projection Mapping Window Display

Using both animation and motion graphics, I will create a Christmas inspired piece to be projection mapped live at the Lincoln West End Lights on 8th December 2017. The main aim of my project is to present a finished product that I can use to both showcase my skills to the public and extend my portfolio. Given the target audience of my project and who the event is aimed at, I will need to ensure that my content is child-friendly and appropriate for the families who attend. For this reason, I have chosen Strand 1 and decided to concentrate on the research and development element of this project. Ideally, I want to create something that is fun and entertaining for the children, whilst simultaneously demonstrating the capabilities of this type of technology.

In order to adhere to health and safety regulations and tackle the issue of possible bad weather conditions, I will be backward projection mapping from inside my own private property onto a fabric pinned to the front bay window. For this, I will need to experiment with different materials to find out which surface works best. With regards to the final output of the project, this will take the form of photographs and videos documenting the finished project.

In terms of challenging my creative and technical skills, the very concept of projection mapping is still new to me and thus, will require some practice getting to grips with the software. As well as developing my skills in Adobe After Effects, I will also be testing my ability my learning new software such as Adobe Character Animator and HeavyM. I will need to ensure that I feel fully confident setting up the projector and using the software, so that everything runs smoothly on the day.

Research Agenda

http://www.fetedeslumieres.lyon.fr/en

When looking for inspiration for my project, I found it particularly useful looking at examples of the projection mapping used at the Fete de Lumieres in Lyon. Although the instillations themselves are much more grand given the presumably large budgets, it is still useful for me to draw upon such work to give me ideas for my own project. From looking at these I can see how artists make use of different spaces and successfully incorporate elements such as sound and music into their work, for a much more impactful audience experience.


https://www.youtube.com/watch?v=kh7d7nePCf0

After an initial search into existing projection mapping projects, I came across this example where a man has placed a projector outside of his house and projected onto a shower curtain liner to create this fun Christmas window display. As mentioned before I will need to experiment to find out which material works best, however, just knowing something so simple could work is already a good starting point.


Ekim, B. (2001) A Video Projection Mapping Conceptual Design And Application: Yekpare. [online] Available at http://hdl.handle.net/11413/656 [Accessed 17 Oct. 2017]

In terms of critical texts, I found this source particularly useful for looking at the technical aspects of video mapping and how the development of a project takes place. Looking at the ‘Yekpare’ instillation by Deniz Kader and Candas Sisman, Ekim breaks down the process of conceptual design for projection mapping into four steps, which he then uses to delineate the methodology carried out with ‘Yekpare’. Following this same structure, I can breakdown my project into similar sections to ensure that my main objectives are achieved and my concept is well communicated to its audience.


Jorgensen, A. (2015) Design Required: Interactive Installation Art Designed to Promote Behavior Change.

Another critical text which I found particularly useful is the work of Amy Jorgensen, who discusses her personal experiences as an artist designing and creating interactive installation art. What I found interesting about her work is how she provides a deeper insight into how audiences respond to art, using various psychological and scientific theories. Although with my project I am not necessarily aiming to convey a strong message to promote behaviour change, it nonetheless led me to consider the narrative of my piece and the importance of storytelling.

When conducting research for my project, I aim to visit the annual Frequency Festival to have a look at some of instillations to gain some inspiration for my own project. Having briefly looked online at the week’s agenda I have already come across a few exhibits that are relevant to my project, one being Andy Johnson Smith’s project ‘Facades’. To get involved members of the public simply email across their selfies and watch as their faces are projected and superimposed onto the Drill Hall Face. In addition to documenting my findings in my blog, I intend to use the event as an opportunity to make contacts and carry out as much research as possible by speaking to those involved with the festival. Moreover, by getting in touch with existing companies that experiment with this kind of interactive technology, I am to find out the types of skills are needed to succeed in this field of digital media. As I am making my piece for a specific event, I have already arranged a meeting with one of the event coordinators to discuss my project and details of how the night will run.

Furthermore, my project will require software which I have no previous experience with, I intend to make use of online tutorials and resources to help with any problems I may encounter. In addition, by carrying out research into existing pieces, whether that be simple exhibit work or large scale architectural mapping, I will be able to gain a better understanding of the type of style I wish to replicate in my own work.

To illustrate my research and development, I will be documenting my progress on my blog, which will include still renders, storyboards and short clips of any content that I have created. In addition, I will include character style guides and all original designs with any alterations made, to show the progression of my work.


Meeting with Frequency Artist ‘Tom Dekyvere’

As indicated in my proposal, I wanted to use Lincoln’s 2017 Frequency Festival as an opportunity to increase my research and development, by looking at existing examples of successful digital installations and seeing what I could learn from these to apply to my own work. After briefly searching through the day by day agenda, I made note of any installations that I thought might be relevant to my project so I could pay them a visit. I then decided, that I would try to get in contact with one of the artists to see if they could answer a few of my questions. Fortunately, after sending an email to Tom Dekyvere, I was invited down to meet with him whilst he finished setting up his ‘Apparatus Florius’ installation.

IMG_2764Although my project is based on projection mapping, I still found it useful chatting with Tom and discussing his light installations. As someone hoping to enter the creative field of digital media, it was good to speak with someone who has successfully established a career for himself and find out how he started everything.

When discussing project proposals, Tom provide many useful tips and questions to consider when pitching an idea for a live installation. For example, what materials will I use? Are these safe for the public? What security will I have in place – both to protect the public and the equipment? How will I transport everything there?

Despite the fact that my project is of a much smaller scale, I still need to ensure that I have covered everything in my own proposal, to avoid any possible problems arising. What was most interesting from meeting Tom, was learning that from an active industry artist’s perspective, he felt that projection mapping was becoming somewhat slightly outdated. Although it is good to possess the skills and know how to do it, he felt that more recently people are looking for interactive installations, sculptures and interior design work. From this it was suggested that in order to really make sure work stand out, you need to combine these technologies to make something even more interesting for your audience. Although I still believe given my project’s target audience, my final idea would still be of interest to them, when thinking about my second semester project, I am now leaning more towards creating a live exhibit or installation.

Furthermore, as mentioned by Tom, it is extremely important to build an impressive portfolio to showcase your work, which in turn helps you receive more work. Thinking now in terms of my longer goals, I am hoping that the combination of my semester A and B projects will help me build a stronger portfolio, that demonstrates a wide range of skills.